This section describes in great detail the process of creating, compiling, and running a simple HeNCE program that computes the dot product of two vectors in parallel. It is best if you actually run htool while reading this section and perform the steps as they are described.
The algorithm used in this example program is extremely simple. Two vectors are allocated. The dot product is computed by splitting the vectors into ``nproc'' subvectors. The dot products of the subvectors are computed in parallel and then the results are summed to form the dot product of the whole vectors. Figure 9 shows the parallel algorithm used. A HeNCE fan construct will be used to create the dprod nodes that run in parallel.
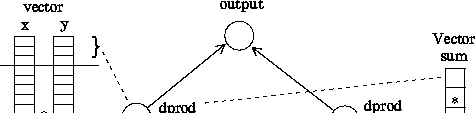
Node init allocates storage for x and y and sets n to their length. It also gives the arrays their initial values. Vector sum will be used to hold the results of the dot product computation on each of the subvectors.
Each replication of dprod will access a subvector of x and y and perform a dot product on them. The result will be stored in a single element of sum. Node output sums the entries in sum to form the final result.
Before beginning to create this HeNCE program, you should verify that you are running X windows (or perhaps Openwindows on a Sun) and that htool is in your command path.
First draw the nodes. With the left mouse button, click on the circle icon on the left of the screen. This ensures that Computation nodes are currently selected for drawing. (It should be the default.) Move the mouse to the lower center of the htool graph drawing area and click the left mouse button. A Computation node should appear.
Now draw the next node up from the bottom. Click (left) on the Begin Fan node icon to select and then click (left) above the Computation node just drawn. The Begin Fan should appear. Continue this procedure for all of the nodes in the graph.
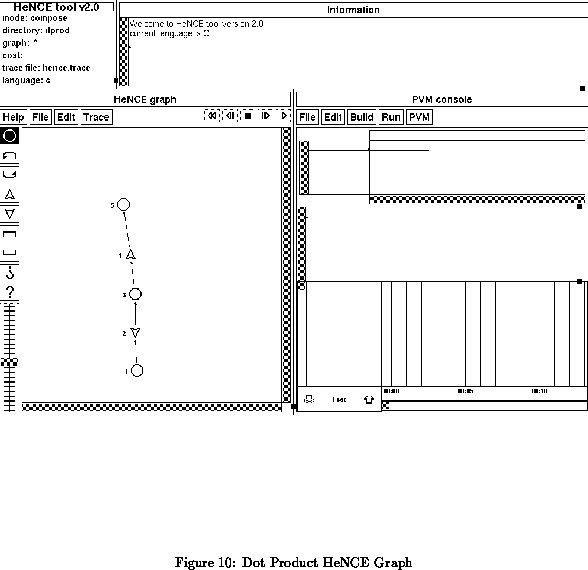
Begin with the bottom node (labeled 1 in Figure 10). Open its node program by clicking the right mouse button on it. At this point, an editor window with text like that shown in Figure 11 will appear.
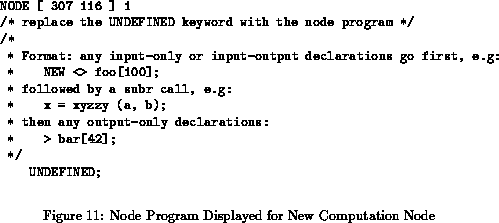
You should ignore the first line of this text. Do not edit it. However, you must replace the UNDEFINED line and (optionally) the comment with the desired node program. Edit the text to read like that shown in Figure 12, but remember not to change the first line.
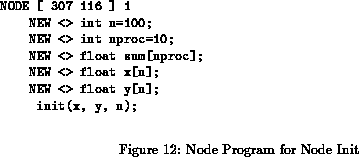
In this node program, the lines that begin with NEW declare variables and allocate storage for them. Many of the variables are also given initial values. The meaning within the program of the variables is described in Figure 9. The line containing ``init'' is the call to sequential subroutine init which is defined in file ``init.c'' and gives initial values to vectors x and y. When this node fires, init will be called.
When you close the editor window, the text you entered will be parsed. If there is an error, htool will complain and give you a chance to make changes. Otherwise, the subroutine name will appear next to the node.
You can look at subroutine init at this point by shift-clicking the right mouse button on the node. The subroutine will appear in a text edit window. If file ``init.c'' did not already exist, you would have to type it in at this point. You can inspect the node subroutine of the other compute nodes the same way, after their node programs have been entered.
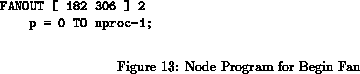
Next, you must give the Begin Fan node (labelled 2) its node program as shown in Figure 13. Do not change the FANOUT line, but instead replace the rest with the ``p ='' line shown. This means that the fan will create nproc copies of the subgraph (consisting of one compute node) within it. Each of the copies will have access to a separate variable p which will have value that range from 0 to nproc-1, inclusive.
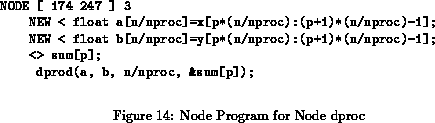
Next, give the compute node labelled 3 the node program shown in Figure 14. This is the node that is replicted by the fan. All copies of it will run in parallel. The call to dprod will compute the dot product of vectors a and b which are subvectors of x and y. The lines with the word ``NEW'' define these subvectors. Notice that this program will work only when nproc evenly divides n. More complicated expressions would be needed for the general case.
The line ``<> sum[p]'' is interesting. The ``<>'' means that what follows will be read from a predecessor node and that any changes made to it will be available to successor nodes. So, each copy of this node will make use of a single element p of vector sum defined in node init to store the result of its dot product. The elements of sum used by each copy of this dproc node will be available as vector sum to node output.
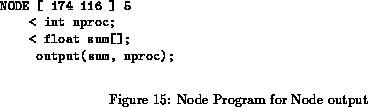
No control construct ending node requires a node program so there is nothing to be done for the End Fan node with label 4, but you must give the top compute node (label 5) the node program shown in Figure 15. The ``<'' lines mean that this node gets nproc and sum from the nearest predecessor node that defines them. Im this program, nproc comes from init and the elements of sum are set by the copies of the dproc nodes. Subroutine output totals the values in sum and prints the result.
When the program completes, a message ``HeNCE executioner exited normally'' will appear in the PVM Console. At this time, pick ``Exit Run Mode'' from the PVM Console Run menu. Notice that HeNCE has created a cost matrix for you. It contains only one host, the one on which you are running htool.
Pick ``Add from Graph'' from the PVM Console Edit window. Another row will be added to the default cost matrix created in the previous step. You must enter values into all of its fields by moving the mouse to a field and typing. Enter the hostname of the second machine and costs for all subroutines. You can just use the value 1 for all costs. At this point, save the cost matrix by picking ``Save'' from the PVM Console File menu and entering a file name, which should end in ``.mat'' by convention.
Build and run just as before. You will see animation on the graph and two hosts in the strip chart at the bottom of the PVM Console. When the program completes, pick ``Exit Run Mode'' mode also just like before.
Before you leave htool, pick ``Halt PVM'' from the PVM Console PVM menu. Do not forget to do this, or you will leave PVM daemon processes running. To exit htool, pick ``Quit'' from the HeNCE Menu at the upper left of the htool window.